
When photographers talk
about diffraction, they are referring to the fact that a photograph
grows progressively less sharp at small aperture
values – f/16, f/22, and so on. As you stop down your lens to such
small apertures, the finest detail in your photographs will begin to
blur. With good reason, this effect can worry beginning photographers.
However, if you understand how diffraction impacts your photographs, you
can make educated decisions and take the sharpest possible photographs
in the field.
The effects of diffraction – that your sharpness decreases at smaller and smaller apertures – are shown in the comparison below. Keep in mind that these are fairly extreme crops:

The reason that this occurs is based upon the
principles of physics; in short, as the aperture gets smaller and
smaller, light waves spread out and interfere with one another
increasingly more. This causes small details of your photographs to
blur.
However, this explanation is overly simple, and it still can be confusing to beginning photographers. What, physically, causes diffraction? At what point does diffraction begin to blur your photographs? Is there anything you can do to prevent diffraction? Are expensive lenses better at controlling diffraction? The answers to all of these questions will be explained in-depth below.
At its most basic, diffraction is the concept that waves – including light waves – can interfere with one another. In fact, every time that waves pass through a slit, they will interfere. To make this easy to visualize, consider waves of water. If you drop a rock into a perfectly still lake, you will cause a ripple of small waves to form. These waves spread out in concentric circles, just like the image below:
What happens if you create a barrier to block the path of these waves? Quite simply, you would stop their movement. This is boring:

To
make it interesting, then, you cut a hole in the barrier so that water
can pass. Now, what sorts of patterns would the waves create?

The waves look similar to how you might expect, although there are a few additional patterns that form aside from the primary wave:

These additional
patterns are artifacts from the wave bending around the corners.
They arise because the two corners act, essentially, as individual sources of waves – waves which can collide with one another. In certain areas of collision, the waves cancel each other out (destructive interference); that is why some areas of the diagram look completely still. In other places, though, the waves add together (constructive interference), which causes an additional pattern to form off to the sides.
To visualize this, let’s say that there is a sensor along the far-right edge of the diagram. This sensor measures the intensity of the waves at a given point, which increases with the amplitude of the wave. A graph of the intensity is shown below:

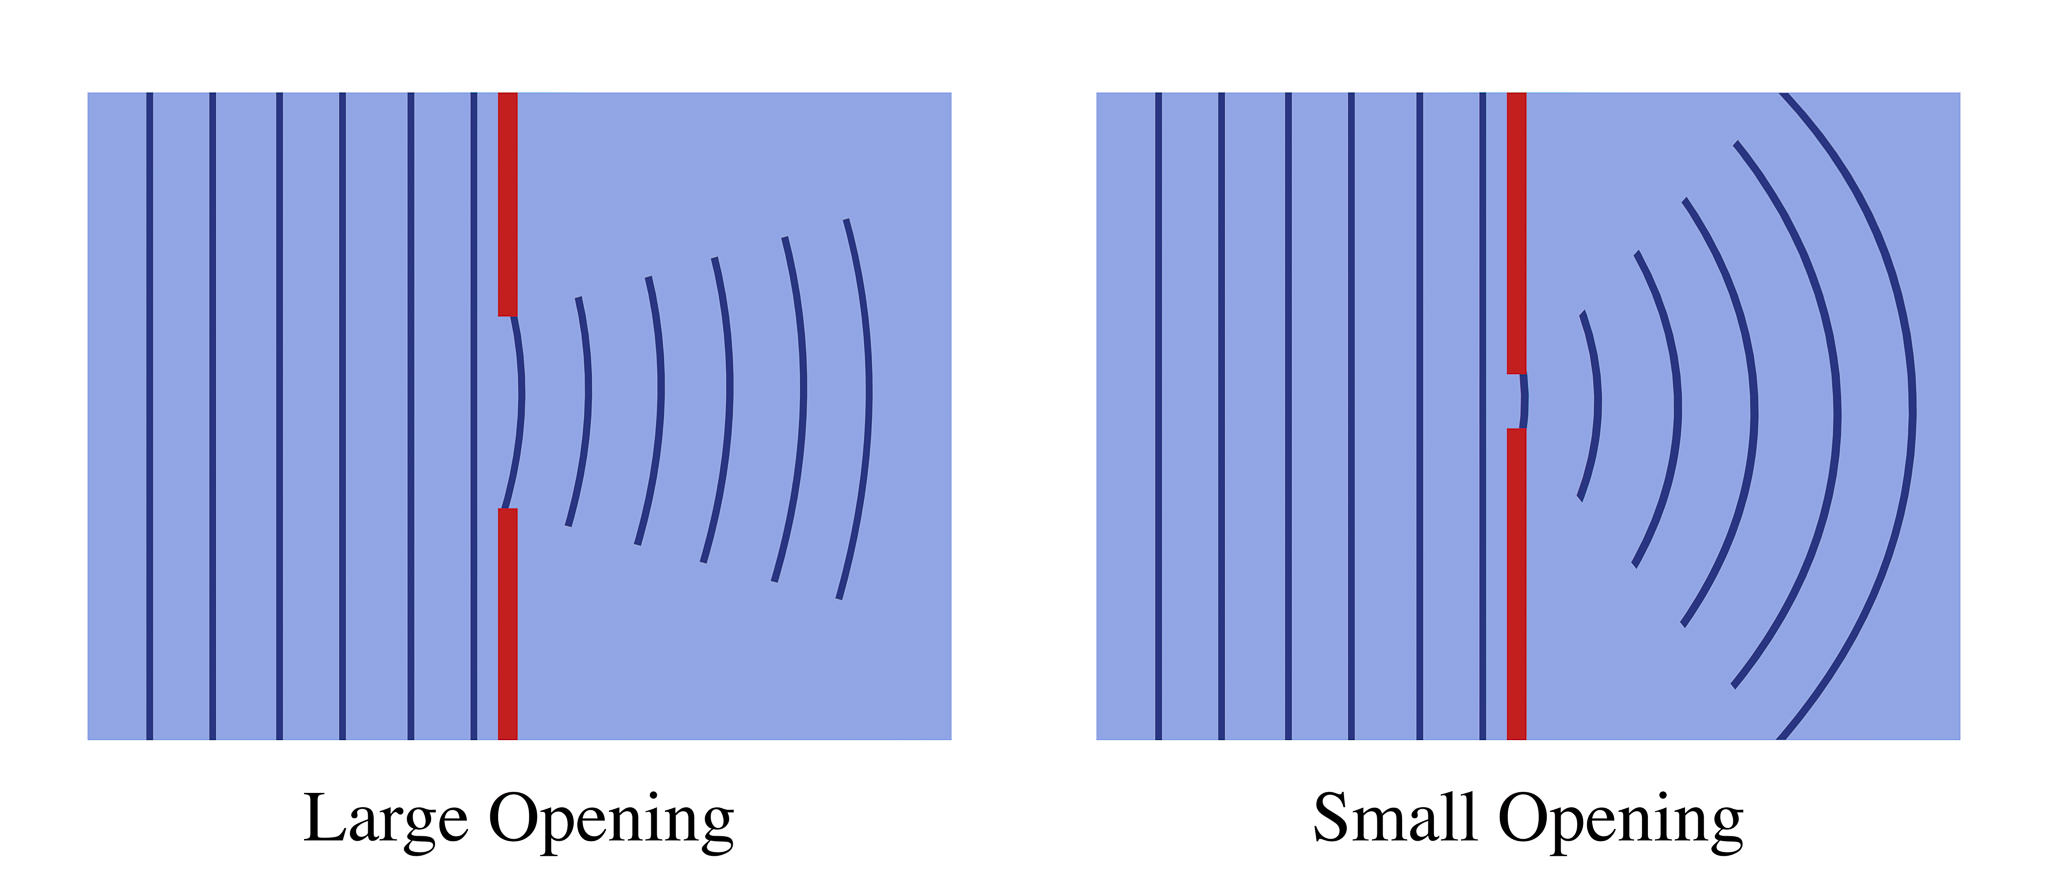
Clearly, the central pattern is the most significant. The patterns off to the side are still present, but they don’t have nearly the same intensity as the one in the center. This means that the central pattern is most significant in photography, as we will cover in a moment. For now, though, let’s see what happens with a large versus a narrow opening in the barrier. Note that the images below have been simplified, and only the central wave pattern is included:
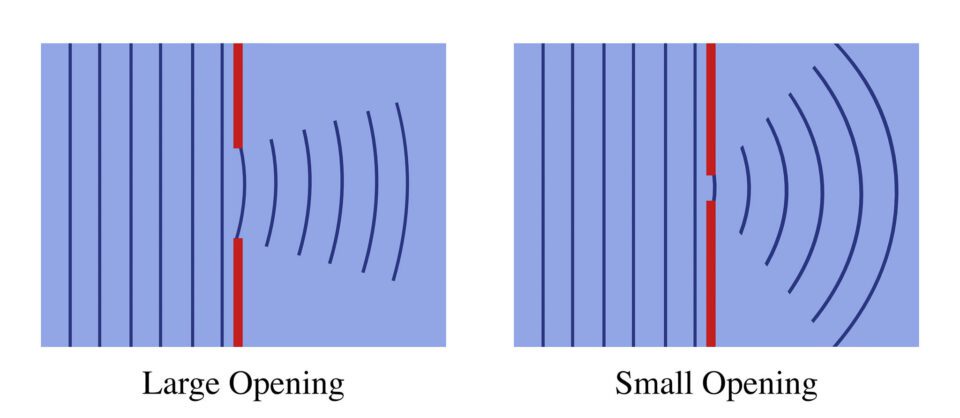
The main difference between these two images is that the smaller opening results in a larger spread of waves, while the large opening causes much less spreading.
Take a look at a comparison between the graphs of the two waves:

Although it may initially seem unusual that a small opening leads to a larger spread of waves, the illustrations above should show that it makes logical sense. Essentially, larger openings allow the waves to pass without much interference. Since the waves are not particularly disturbed, they follow a relatively straight path towards the edge of the pool. Smaller openings, though, affect a wave more significantly, causing it to bend at harsher angles. (This is a slight simplification; for more technical information, I recommend reading the Wikipedia page on the Huygens principle.)
Finally, note that a “small” opening is relative. In fact, the opening only causes diffraction when it is similar in size to the wavelength that passes through it. This is why light, which has a tiny wavelength, will not diffract significantly if it passes through a ten-foot wide opening – even though the ocean does.
Congratulations! You now understand the physics of diffraction. At its most basic, a small opening causes waves to bend and interfere with one another; this, in turn, spreads out their signal.
It all comes down to the aperture of a lens. Shown in the photograph above, the aperture blades in a lens act as a single slit that passes waves of light. A pattern of the light’s intensity is exactly what you would expect to see:

This,
though, is a two-dimensional graph. In the real world, a pinpoint of
light projects in three dimensions. So, a more accurate graph appears
below:
This three-dimensional pattern occurs every time that light shines through the aperture in your camera lens. When projected onto the sensor of your camera, it looks like this:
The figure above shows what is known as an Airy disk. This is, quite simply, the appearance of a diffraction pattern when it hits your camera sensor. The central region is the brightest, and it has the largest effect on your photographs.
It isn’t difficult to tell why this Airy disk can cause a photograph to blur. We already know that a small opening – or, a small aperture – causes waves to spread out. This means that, at small apertures, the Airy disk becomes much larger. If you can envision the Airy disk as hitting your camera sensor, you get a picture that looks like this, where the grid represents the pixels on your sensor:

Now,
think of a scene as being composed of countless tiny sources of light.
Every pinpoint of light travels through the aperture of your lens; as a
result, each part of your photograph projects onto your sensor as an
Airy disk. These, as shown above, become blurrier with small aperture
values. This is the reason that you see diffraction!
The effects of diffraction – that your sharpness decreases at smaller and smaller apertures – are shown in the comparison below. Keep in mind that these are fairly extreme crops:

(To
see the sharpness differences more clearly, click on the image. Pay
particular attention to the pattern of colored dots on the woman’s
face.)
However, this explanation is overly simple, and it still can be confusing to beginning photographers. What, physically, causes diffraction? At what point does diffraction begin to blur your photographs? Is there anything you can do to prevent diffraction? Are expensive lenses better at controlling diffraction? The answers to all of these questions will be explained in-depth below.
1) The Physics of Diffraction
In explaining diffraction, it can be difficult to straddle the line between avoiding and embracing references to optical physics. Most photographers are interested in day-to-day knowledge rather than comprehensive background information, but it is impossible to talk about diffraction without describing how it works at a fundamental level. That said, this section is meant to be understandable even if you are not a physicist; we recommend reading it, since it will provide a more solid foundation for your understanding of diffraction.At its most basic, diffraction is the concept that waves – including light waves – can interfere with one another. In fact, every time that waves pass through a slit, they will interfere. To make this easy to visualize, consider waves of water. If you drop a rock into a perfectly still lake, you will cause a ripple of small waves to form. These waves spread out in concentric circles, just like the image below:

What happens if you create a barrier to block the path of these waves? Quite simply, you would stop their movement. This is boring:
(The waves on the left-hand side, of course, would continue to bounce around; that isn’t shown in this diagram.)
The waves look similar to how you might expect, although there are a few additional patterns that form aside from the primary wave:
Note
that this diagram is slightly simplified. In the real world, you would
only see the exact pattern of waves on the right-hand side if the
incoming waves were perfectly parallel.)
They arise because the two corners act, essentially, as individual sources of waves – waves which can collide with one another. In certain areas of collision, the waves cancel each other out (destructive interference); that is why some areas of the diagram look completely still. In other places, though, the waves add together (constructive interference), which causes an additional pattern to form off to the sides.
To visualize this, let’s say that there is a sensor along the far-right edge of the diagram. This sensor measures the intensity of the waves at a given point, which increases with the amplitude of the wave. A graph of the intensity is shown below:
Clearly, the central pattern is the most significant. The patterns off to the side are still present, but they don’t have nearly the same intensity as the one in the center. This means that the central pattern is most significant in photography, as we will cover in a moment. For now, though, let’s see what happens with a large versus a narrow opening in the barrier. Note that the images below have been simplified, and only the central wave pattern is included:
The main difference between these two images is that the smaller opening results in a larger spread of waves, while the large opening causes much less spreading.
Take a look at a comparison between the graphs of the two waves:
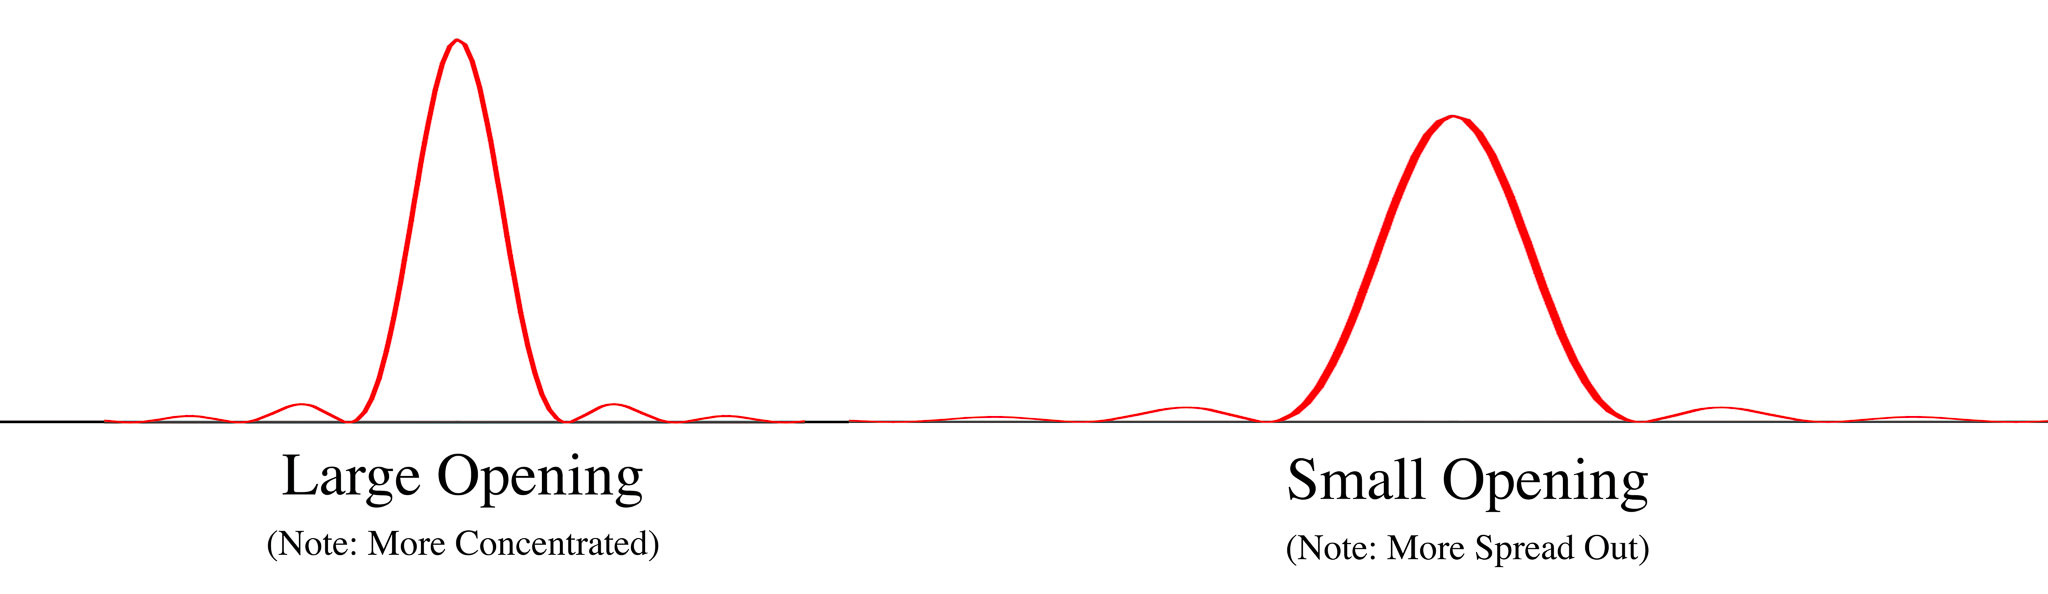
Although it may initially seem unusual that a small opening leads to a larger spread of waves, the illustrations above should show that it makes logical sense. Essentially, larger openings allow the waves to pass without much interference. Since the waves are not particularly disturbed, they follow a relatively straight path towards the edge of the pool. Smaller openings, though, affect a wave more significantly, causing it to bend at harsher angles. (This is a slight simplification; for more technical information, I recommend reading the Wikipedia page on the Huygens principle.)
Finally, note that a “small” opening is relative. In fact, the opening only causes diffraction when it is similar in size to the wavelength that passes through it. This is why light, which has a tiny wavelength, will not diffract significantly if it passes through a ten-foot wide opening – even though the ocean does.
Congratulations! You now understand the physics of diffraction. At its most basic, a small opening causes waves to bend and interfere with one another; this, in turn, spreads out their signal.
2) In Photography
Clearly, diffraction is an important concept in physics. In fact, a similar experiment (with two slits rather than one) played a major role in proving that light can behave as a wave – one of the most important discoveries in scientific history. But how does this impact your everyday photography?It all comes down to the aperture of a lens. Shown in the photograph above, the aperture blades in a lens act as a single slit that passes waves of light. A pattern of the light’s intensity is exactly what you would expect to see:

This looks familiar! That’s because light, similar to water, travels in waves. (Image from Wikimedia Commons.)
This three-dimensional pattern occurs every time that light shines through the aperture in your camera lens. When projected onto the sensor of your camera, it looks like this:

The figure above shows what is known as an Airy disk. This is, quite simply, the appearance of a diffraction pattern when it hits your camera sensor. The central region is the brightest, and it has the largest effect on your photographs.

It isn’t difficult to tell why this Airy disk can cause a photograph to blur. We already know that a small opening – or, a small aperture – causes waves to spread out. This means that, at small apertures, the Airy disk becomes much larger. If you can envision the Airy disk as hitting your camera sensor, you get a picture that looks like this, where the grid represents the pixels on your sensor:
(Note
that, in reality, the Airy disk grows dimmer as the aperture grows
narrower; to simplify the diagram, this effect is not shown here.)
To be continued..
loading...


0 komentar:
Post a Comment